

March 27, 2014
Been bustin' out the paint and sandpaper trying to get the ol' girl looking like she used to. Since the last update, The engine is been in and out a couple of times (checking the motor mounts and clearences), the belly pan has been painted and put back on, the wiring for the cockpit has been completed, the steering has been installed, the rudder, pitman arm and bushings have been fabricated and installed, the thrust bracket and bearing has been aligned and installed, and there has been dust and primer flying!
|
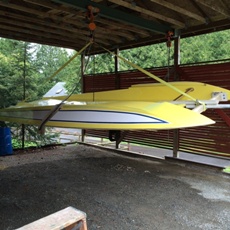
Rolled over so I can do some additional
paint work that needs to be done.
|
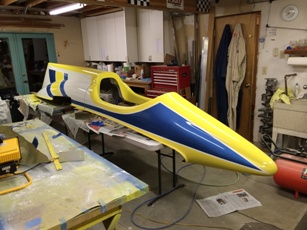
For those who have been following me on Facebook, you saw that I moved the cockpit cowl into the basement to paint. Well, Mary informed me that it made the whold house "stink" so I got a bunch of fans and waited until the temperature moderated and I could open the doors and blow the odor outside! I seemed to work because the complaints went down to "well, it's OK. I can live with it!" That, at least, got the cockpit done to a point I could do the layout on engine cowl.
In the meantime, I rolled the boat over onto her lid because the paint was a little thin on the sponson bottoms and in some of the hard-to-reach areas because the roll around we had put the boat really low. I got a chance to get those areas covered up and by the end of the weekend, it will be back on its feet for the deck work.
|
|
Cockpit and Engine cowls are now waiting for Graphics
|
On April 5th, the City of Kenmore will be re-enacting the Slough Race. This was an outboard race that ran between Kenmore and Lake Sammamish down the Sammamish Slough. The race took place between 1933 and 1976. The annual event brought out thousands as they lined the bank of the Slough hoping to see someone lose it and run up on the bank (which DID happen quite a bit!) The Slough has not had boats running up and down it for many years, and there is a control area near Marymoor Park that prevents boats from travelling the full length any more.
The timed race will start at the Kenmore Boat ramp, next to the 68th Street Bridge, will come out of the mouth of the Slough, circle a course off Logboom Park and finish back at the bridge. There will be a display of boats (including The Gold Streak) at Logboom Park.
I'm close...so close I sent my entry in for the Soap Lake race that will take place on June 14-15. So I'm committed!
Keeping fingers crossed!!!!!!
Nov 21, 2013
Just before we took the hull down to Jeff Schnieders Maaco Kent, WA shop, Gordy, Travis and Stephanie Gillmer came over and we glassed the flanges on the cowlings. Once we got the base shape done, it was time for paint. Phil Lampman (aka, well too many aka's to list here) came over and helped by putting his "Jedi Sander" skills to work. By the 4th of July, the entire hull was primed and wet sanded. We cleaned up the garage, got the hull onto the trailer and took it down to Kent.
|
|
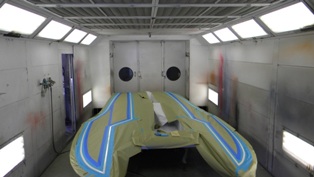
Masked, in the paint booth and ready for the blue stripe.
|
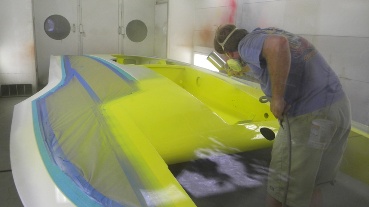
The weekend of July 6-7, Kim Labrie let me borrow her husband for the weekend. Jimmy met me at Jeffs Saturday morning around 9am and off we went getting everything set to lay the paint. He even bought a brand new spray gun!!!! (I think he didn't want to take a chance of having Qatar maroon bleeding into my yellow as he had just finished working on the U-95).
|
|
Jimmy Labrie doing what he does best! Making boats look good!!!
|
After a long Saturday and full Sunday, the Gold Streak looked like days of old! (only with new paint!) Rolls and rolls of tape along with many feet of masking paper got the Streaker pretty much done in a couple of days. Yeah, it needs some touch up, the the main part is done!!!!
After we got the boat home, fitting of the engine, getting a new prop shaft from Kelly Stocklin, Getting rudder work done by Fred Wright and Oil pan mods done by Jeff Campbell, engine work was being accomplished, hardware was getting installed and more paint on the cowling is being applied. Still lots left to do, but list is definiely getting shorter. At the risk of losing credibility, I guarantee you'll see the Gold Streak in the water this summer...
June 20, 2013
Dashboard wiring - figured out and 90% complete
Deck Plywood - fitted and attached
Deck faired (lumps and bumps ID'd and addressed
Fiberglass applied with multiple coats of resin
Deck hatches cut
Cowling flanges fitted to deck
As you can see, I haven't been sitting on the couch watching TV since the last update :)
Check out the hull section in the restoration photos and you can see where we are at today. I recruited Phil Lampman (aka Jedi Sander (from Wahoo project) - Cleco Boy, Rudder Rat, Don Mock's whippin' boy and numerous other names associated with the Blue Blaster project) to continue to hone his newly founded talents on the Gold Streak. Phil lives up on the Plateau and is only a short distance away so his commute is pretty short. I really appreciate his help. It's moved things along!
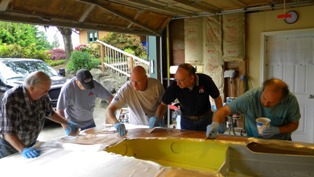
|
Don Kelson, Phil Lampman, Steve Compton, Dixon Smith
and Jerry Kelson spreading the resin on the deck fiberglass
|
The next couple of weeks will be spent getting the hull ready to go for paint. I'm going to catch Jimmy LaBrie between races (and painting unlimiteds) and Jeff Schnieder has agreed to free up a paint booth so we can get some paint on this baby! Shooting for the weekend after the Fourth of July. Getting excited!
|
|
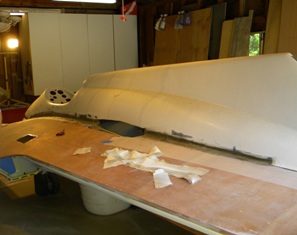
Cowling flanges fitted
|
Need to get the trailer ready also. The trailer won't look pretty (yet), but we'll get it functional so we can haul the boat down to Jeff's. Over the next few weeks between the bondoing, sanding, priming, over and over and over in order to get her looking right, and getting the trailer ready, there will be no time for resting! Damn, I thought this vintage stuff was easier than racing!!!! Oh well, I really want to go play with the rest of my vintage buddies so the effort WILL be made!
Last Friday Gordy and Travis Gillmer came over and we started working on the cowlings. Both cowlings needed to have the flanges re-worked so they fit the deck. We also discovered that the engine cowling was a little bowed at one point so we fixed that first. Last Sunday (June 16th) Gordy returned with daughter Stephanie in tow. Gordy and I got the flanges started so during the past week I've been reinforcing them with more glass and resin.
January 31, 2013
Busy Summer, busy fall and starting to be a busy winter. Since the last update in May, we had Jimmy LaBrie come over and paint the bottom. I turned her over and painted all the compartments that will be covered up by the deck. Then, it was time for deck battens. For those of you who have done decks before, you know that it really takes time to be sure everything is nice and faired.
So it's been time to start fitting hardware and getting things lined up to getting ready to put down the deck. I decided to put in modern deck hatches rather than the "pie eyes" that were originally on the boat...more room to work and it will look, in my humble opinion, better.
|
|
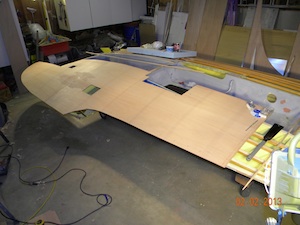
Fitting plywood decking
|
So, I thought I had nailed down the color. As it turns out, one of the people who did some painting on the Streaker when she was racing was Dale Vanweiringen. Dale calls the other day and says, "I found a folder that had Dalton Coors name on it." "It's got the paint codes inside, you want them?" Uh, yeah! "chrome yellow" was right next to 59119 which turns out to be the color Dale had down. Oh well, it looks like the bottom will be a shade lighter than the deck and non-trips. It's nice to know I got the right color tho...
Well, I couldn't help myself, (this is what just about everyone I talk to who is doing a restoration says...) I haven't quite finished fairing all the battens, but the ones I did, I just HAD to see what it would look like with decking on it. So I rough cut a couple of sheets and screwed them down to see what I had. Now I'm even more excited to finish up the fairing and get the deck down. Starting to look like a hydroplane again!
May 28, 2012
I've got the best wife in the world! Even during some of that crazy weather we had up here in the Pacific northwest, Mary was OK with me keeping the boat in the garage and parked her car under the shed roof. It might have helped that I kept working on it. I suspect if I had not, we (the Streaker and me) would have been under the shed instead...
|
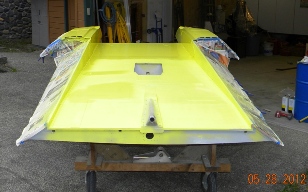
Bottom painted with
DuPont Imron #8550 "Chrome Yellow"
|
I kept working away trying to get her ready for paint. You can't believe how many nicks, dings and dents that honeycomb can get! I used 1-1/2 quarts of bondo so far just on the little stuff. Everytime I shine the lights differently, there's another one!
After finding most of them, I started using some cheap spray primer to see how they would look painted. After a month of this, I felt like I was ready.
When I was crewing on the Streaker, Ron Doss told me once that he thought the color was "Chrome Yellow". At the time, Imron was the paint of choice and we were told that Ron Sr. had used Imron. I went up to Wesco in Burien and Carol and I looked at color chips and compared them with the sample I had recovered when I took the deck off. Really close, so I had her mix up a quart to try. (and I thought it was expensive back then!!!!!). There was a place on the bottom, underneath the belly pan that had not been touched by the sun, or had not been painted white. I mixed a small batch, and brushed it on and let it dry. Next day when I came back, I knew where I had done it, but I really had to look for it. With it being that close, I HAD CONFIRMED MY COLOR!!!!!
|
|
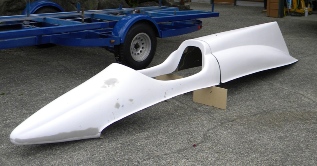
New Cowlings by Gordy Gillmer
|
A couple of years ago, Gordy Gillmer and I were talking about cowlings. We didn't know where the original moulds were, so Gordy decided to see if he could make a plug for the cockpit from some parts I had, some he had, and a cowling the Museum had. Between the three parts, he was able to make one like the Gold Streak use to be.
Last year, we found out that Dave Bartish had the original engine cowl mould in one of his warehouses in Detroit. So Gordy used some of his connections and we were able to get the mould on one of the team trailers when they were back at the Gold Cup. Over the winter, Gordy was able to lay up the engine cowl. He delivered it last weekend and as you can see, IT FITS!
What is even better about this story is that Gordy worked for Ron Sr. during the time the Gold Streak was built. His job at the time was laying up the fiberglas cowlings. He seems to recall that he did the cowling for both the Gold Streak and her sister ship, Al Curtis's Gladiator. I got a new cowling, made by the guy who did it originally, from the original mould! Pretty authentic I should say...
March 8, 2012
I got to move the Gold Streak into the garage! Mary is being a real trooper about it. As long as I did a magnetic sweep of the area under the shed so she could park her car under cover without getting a flat tire, she would be OK with it.
That was easy :)
|
|
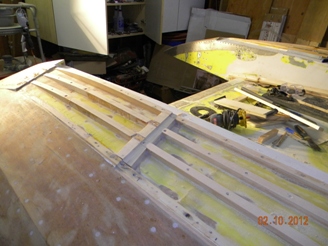
New runner on Right sponson
|
So, I was able to get the heater and lights going, and glassed in the piece of leading edge I had to cut away when removing the old reinforced cockpit. So while she's upside down (again), it was time to re-do the sponson runners. It turned out that they had been deepened a bit so I went and re-calculated the angles and all, and was able to not have to re-build them completely. I remade the runners and will use 1/8" 6061 and everything SHOULD be pretty close.
I took the metal parts down to Mike at Electrofinishing in Kent last month and now we've got Gold anodized parts back. Check that off the list!
Brother-in-law Andy Thompson, along with his lovely wife Julie (and of course puppy Toby and Emma) came over the weekend of Feb 18-19 and we started the sanding process to get ready to paint the bottom. Boy, that's been a long time coming, and a lot of work!
One thing came to light since the last update. I was contacted by photographer Phil Kunz (via Bill DeGlopper), letting me know he had photos from the 1981 Dayton Nationals. In reviewing what he had, I finally got a good picture of the transom. It turns out I had set the drag link up on the left, and the original setup was on the right. My desire to make her as original as possible means I've got a bit more work to the steering setup...oh well.
Over the next few months, we're going to be needing to work on Miss Thriftway so E-27 will most likely get put back under the shed, Mary's car back into the garage, and working on fitting in our SECOND re-built Allison V-1710 into the hull. We tried to make everything identical to engine number one, but no matter how hard you try, each one will have their own unique quirks on how it goes into the boat!
Who knows, maybe Mary will let me leave her in the garage and I can continue progress...
November 20, 2011
Even with all the activities and meetings that have taken place between July and now, I really have been plugging along, doin' stuff! Many of you have been asking "How's it goin' with the Gold Streak", so I've posted some pictures in the "Restoration" section to show you some of the progress!
|
A few more things have been done -
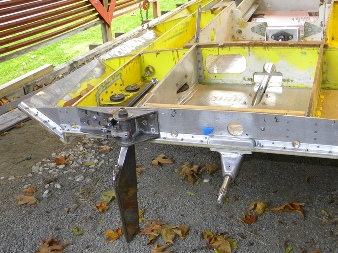
Drain holes, rudder, steering gear, drag link...
|
Here's the list:
- made the mounting brackets for the rear steering gear
- located and mounted the rear steering gear
- made the rudder drag link
- bought all the steering chain and gears
- made the thrust bearing bracket
- drilled the drain holes (and got the plugs)
- mounted the skid fin bracket
- made and located the battery tray
- made the fuel tank tray
I am in the process of making the bracket that the steering wheel gears will attach.
I'm all set to spend the full day doing Gold Streak stuff, but as I sat down to do this update, the thermometer shows 25.2 degrees! (I don't think any glue will be applied today!) But...I've got a bunch of other stuff I'm going to work on (in the warm shop).
July 17, 2011
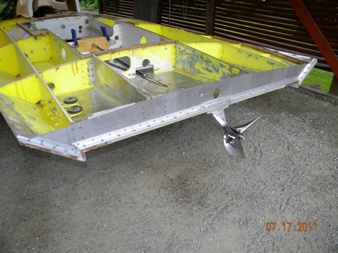
Once the weather had started to cooperate, I was able to make some major headway. The strut is attached, the transom is completely attached, Gordy is making new cowlings (the engine cowling will come out of the original mold!), and I got re-connected with the guy who basically ran the boat for Dalton Coor when it was down here, Bernie Caufman.
|
I just HAD to see what it looked like with the prop on the back!
(More photos in the Hull Restorations Section)
|
The story about re-connecting with Bernie is really unique. It has to do with Miss Thriftway.
At Tastiní n Raciní, we gave a ride to an auction winner from Bellingham. He brought his cousin with him. His cousin ended up getting a ride too (he purchased it). During our down time, we were talking, and I mentioned that I was in the process of restoring the first real race boat I had crewed on called the Gold Streak. He perked up and said his brother-in-law used to talk about a race boat and he thought it was the Gold Streak. I asked what his brother-in-laws name was and it is Bernie Caufman.
A couple of weeks passed, then I get this email from Bernie telling me what he has been up to the last 30 years. He was pleasently surprised to hear that I had the Streaker and told me he has some stuff form it. Well, Ron Doss and I see each other once a month when he comes into Compton Lumber to inventory our business forms (he and Gayle own Targa Business Forms), and he has told me on more than one occasion that if I could locate prop #4, I should try to get it because that was our "hot" prop.
In one of the emails, Bernie told me he had prop #1, that Dalton had given it to him when Bernie visited Dal and Donna over 15 years ago. That was interesting because I had prop #1 in the basement...it came with the boat. I emailed back and Bernie responded: "Steve...Thanks for the note. After reading it, I thought how could you
have # 1 prop, there was only one. Well if I would have put my glasses on and read what I have it would not be # 1. I have the hot prop we used a lot, good ole # 4 ".
Earlier, Bernie had included his phone number so I just had to call him. Long story short, I went up to Arlington and Bernie and I spent 3 hours just catching up and I came home with prop #4 so I could get it magnaflux tested. I'm happy to say that B&G Machine reports that "there were no defect found"! YAY! Next step will be to have our buddy Scot Baker of Scot Baker Props do his magic on it.
Do you believe in Six Degrees of Separation? I am beginning to think there is something to it! What is the chance that nine years ago, a customer walks into Compton Lumber, gets me involved in the Miss Thriftway project (OK, I was a VERY willing participant!), and it leads to me getting the Gold Streak and re-connecting with so many old friends? At this point, life is pretty good!
In less than two weeks we will be in Tri-Cities with Miss Thriftway for multiple exhibition runs, the following weekend will be Seafair, then two weeks after that Coeur d'Alene. Three exhibitions in four weeks! That's a lot for a bunch of old guys!!!!!!
June 5, 2011
I got both the new floor pieces glued in which means it's time to really put this thing together. I laid out the steering quadrant locations and routed out the honeycomb to insert a chunk of Ash wood so the core would be solid for not only where the gear needs to go through the stringer, but to give support to the thru bolts. I received the drawings Ron had made for this so now it's fill steam ahead!!!
Next up, finish fabricating the stringer piece, get the two rear stringers glued in, fabricate the quadrant brackets and get the steering installed. Need to make that wedge for the strut. Once the transom is in place, then bolt up the strut.
Next weekend is Tastin' and Racin' here on beautiful Lake Sammamish. Time to play with the big boat (Miss Thriftway)! Gold Streak will take a break...
May 30, 2011
The shaft log liner is now glued in and trimmed. I bolted the strut in place to double check the shaft alignment. Glued in a little patch that was needed, so now I can remove the transom and lay in the new floor liner to tie everything together which will also act a a doubler for the air trap break. Some fine tuning and it will be time for more Hysol!!!
May 29, 2011
Cut & ground down the shaft log liner and bolted the strut in place to double check the shaft alignment. Glued in a little patch that was needed, so now I can remove the transom and lay in the new floor liner which will also act a a doubler for the break.
May 28, 2011
Enthusiasm...For me it seems to be driven by the weather! In November, Mary let me keep her car outside so the Streak could be in the garage. Well, that didn't last too long so under the carport she went and the Honda was back in the garage. As stated above, the weather has just been way too cold to get enthused about going out and crawling around on the ground and working on a hydroplane. BUT...we're getting warmer now and my enthusiasm has returned!!!!
I was fortunate to steal some time from Ron Jones a couple of weeks ago and brought him up to consult on a few things. One item he told me was to raise my strut depth. That meant cutting an welding on a new plate, but if the Master says to do it, you should do it. I am now in the process of re-aligning the strut and shaft angle. The current photos show the prep on the shaft log hole and installing the aluminum liner. HYSOL WILL BE MIXED TODAY!
May 1, 2011
It sure is nice to have people interested in what your doing! On Facebook I've been complaining about how cold the weather has been because Mary wanted her car in the garage, the Streak had to go back outside under the carport. Well, when it doesn't get above 50 degrees, and the wind blows, it makes it tough to get too motivated to go out and work on a boat. So I went over to Moses Lake on Saturday to see all my buddies and they told me that I really need to keep the website up so they know if they should be ready to see the yellow boat or not!
We drove back Saturday night and spent Sunday working on the boat. (65 degrees is soooo much better than 48!)
While at Moses, I talked to one of my fellow vintage participants who just happened to get a whole bunch of 273 parts. One of which is an oil pan that I could use. The boat has been upside down all winter, so I needed to turn her over and take the test block, put on a standard oil pan and determine if I needed the custom pan or not. It turns out I do (see photo in the hull section). Let's talk team Calypso!!!
I also posted current photos of the black engine showing what I have done over the winter.
January 1, 2011
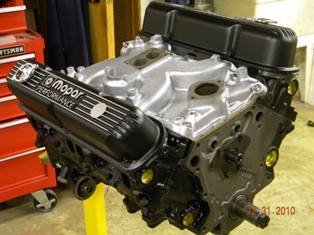
|
The Black engine will be the first one run in
The Gold Streak
|
The holidays are now over, and it's time to get crackin' on some boat stuff! I haven't been totally idle over the past few months. I cut the shaft log hole in the bottom, I worked on the engine and I've had multilple consultation sessions with Ron Jones about different appraoches on strut depth and sponson configurations. Lots to think about.
I've accumulated a couple of stromberg 3-249 carburetors and made contact with a guy back east who races stock cars with a 273. He rebuilds them to maximum factory specifications and still stays within the specification rules. I built the shipping box today and will be sending them off next week.
During the past couple of months I also acquired another single plane intake manifold, and an early style timing chain cover. Both are in better shape than the ones I was planning on using. If anyone is interested, I have an extra single plane intake now that fits the 64-65 heads (different bolt angle). Since both my engines are using commando heads, I can't use this one. It's in good shape and already painted. Asking $75. I can send pictures to interested parties.
I got a set of Mopar performance valve covers and I just couldn't resist putting them on!
November 2, 2010
I talked Mary into letting me move the boat into the garage (her Honda will be under the shed roof).
As long as the temperatures stay above 50 degrees outside, I can get the garage up to 60 without too much trouble. That's about the minimum I would like to see to get the Hysol to kick.
As I mentioned on my October 14th entry, between Miss Thriftway and some personal stuff, I've been ignoring The Gold Streak. But now, I'm getting my attitude back and starting to pick away at a few things. I discovered the reinforcing plates for the skid fin were not stout enough and had collapsed under the strain of the bolts. I filled the holes and replaced both plates and used a 3/16" thick one for the one inside. I also made it wider to spread the load.
Another thing I did since September was get out one of the old 273 blocks, put the crank in, and see about where it was going to be positioned for the prop shaft. This also gave me an idea as to how far over to the right I could move it.
I positioned the strut unit, drilled the holes and installed the inserts. I measured the strut to be 7-1/2 degrees and confirmed with Ron Jones Sr. that was close to what he had to do back then. Ron told me that anywhere between 7-1/2 and 7-3/4 degrees would work so I'll be cutting the shaft log hole soon.
Another "discovery" was that the skid fin bracket needed replacing. It was bent almost 1/8" at the bottom. The original position was 90 degrees, but when Dan Doidge raced it as a 6 liter, he changed it to what appears to be an 11 degree angle. I had Don Kelson cast me a new bracket and am in the process of fitting it to the new plates.
October 14, 2010
It has come to my attention that there is a rumor out there that I have sold the Gold Streak.
This is NOT true!
The past few months have been taken up with Miss Thriftway activities and some personal stuff that took away from working on Gold Streak.
Unfortunately, the weather has turned into Fall, so temperatures are not too condusive for gluing. This will slow things down even more. I was hoping to have a few more things done by now, but that's the way things go sometimes when you are restoring something that is 30+ years old. I keep running into things that need to be addressed. I've got most of it figured out, and am working on heating my garage so I can keep moving forward.
Thanks to all of you who have been emailing me with questions...I posted some of the repair pics I did back in September.
July 31, 2010
The past few weeks have been busy with Miss Thriftway. We ran four exhibition runs at the Lamb Weston Cup in Tri Cities last weekend. We went down on Wednesday and was the background and some feature stories on KVEW, the ABC affiliate in Kennewick.
BUT, that didn't stop me from shaping the .032 sheet to cover up, and act as a doubler, for the the rear compartments behind the engine. I got those done, put her right side up on the roll around (hasn't been that way since April) and decided to work on the transom and rudder bracket supports.
July 15, 2010
Over the past week I removed the belly pan and looked at where the thrust bearing bracked will attach. There seem to be a number of holes where the belly pan bolted through that were missing inserts. I opened up the holes and glued inserts in, so now we'll have a more solid attachment of the belly pan. One other "discovery" was that some of the bolts that will attach the the thrust bearing bracket will be buried under the belly pan. I'll be gluing some nut plates in so the bracket can be bolted on from the top
Next up will be grinding on the glue joint of the back piece then make and install the doubler. I'm thinking that I may just cover the entire floor with .032 abd that will take care of the area where the thrust bearing bracket will go as well as the patch joint. It may only add an additional pound or two, but it will be a lot stronger!
July 6, 2010
Finished up the right side of the cockpit and skinned it with the aluminum. Punched out the holes on the left side and got the patches glued in. Will grind on the patches to smooth them out and get ready to skin it.
Pulled off the belly pan and cleaned up the inserts for what used to be the thrust bearing bracket. I'm going to re-work that area and make a new bracket that will fit the old holes. Once the bracket is made, I'll run some support arms back to the engine stringers.
I added a receiver hole for the transom roll over pipe.
June 30, 2010
I got a little bored with looking at the bottom, so I decided to work on repairing the cockpit stringers. Over the years numerous holes had been cut for access. I'm going to incorporate deck hatches for my access. I know, I know...that's not the way it was done originally, BUT...anyone who has had to work on one of these things knows a deck hatch is a much better way to go...so that's what is going to happen!
I used a router and made some rectangular templates to cut out enough to insure I was going to glue to clean, fresh honeycomb. Once everything is patched up, I'll skin the entire surface with .032 6061T6 Aluminum go give it a nice clean surface. Add doublers on the backsides and things will be ready to roll her back over and finish the bottom/sponsons.
June 19, 2010
The last couple of weeks have been focusing on the "big" boat, working on stuff for Tastin' n Racin'. The weather really cooperated and Miss Thriftway ran great! I was fortunate enough to be the driver to give Duke Moscrip (Duke's Chowderhouse) a ride in Miss T as our "Thank you" to Duke for helping insure the H1 Unlimiteds would be at Seafair. In addition, our newly appointed National Vintage Chairman, Doug Whitley, was on hand so we put him in the boat and gave him a tour of the course. Then, Doug being the former racer he is, took the wheel for a few laps to see how Thriftway compared to his 7 liter "Best Whishes" - Bill Munceys old boat. Now that TnR is behind us, this weekend I'll go over to Vashon on Saturday and help pull the motor and clean all the sand out from Lake Sammamish State Park! On Sunday, Father's Day, Mary, Ryan, Eric and I will go golfing out at Richard Rutledge's Twin Rivers Golf Course in Fall city.
Miss Thriftway has been invited, along with Dixon Smith's Miss Bardahl, to participate at the Lamb Weston Cup in the Tri Cities at the end of July. Along withh our older versions, the Museum will run John Goodman's 1982 Atlas Van Lines (Chip Hanauers first Gold Cup winner) and Eric Mann's 1980 Griffon Miss Budwieser in exhibition runs. That will take a few weekends away from working on the Yellow boat! Oh well...how can you argue about playing with the big boat?
I've been picking away at a few things and hope to have the bottom pretty much done by the end of the month. I should be able to make that deadline. On Friday I was able to glue and rivet the doubler on. One more thing off the checklist!
May 31, 2010
I spent some time and went over the bottom with a fine tooth comb. I found quite a few places that needed attention so I just fussed around and patched the bad spots. The worse was on the right sponson, I kept pulling and pulling and it was loo about 2-1/2" down. So I cut out all the bad part and will need to re-skin and put a doubler over it because it's in a high impact area. I'm also going to skin the sponson chamfer with aluminum to overlap the repair and doubler.
I also cut the doubler piece that will span the joints on the big repair piece on the bottom.
I removed the primaries to see what was underneath. I'll be re-configuring the sponson runners back to original. (I took some good photos when we were racing her!)
May 12, 2010
After I got the patch piece under the seat glued down and the masking tape removed, I did some sanding. I cleaned up the glue globs around the big piece I did a couple of weeks ago. I experimented with sanding down to the yellow under the white on the bottom and started to get quite a bit of yellow showing. Then...I thought, aw, I'll see what's under the non trips. Well, to my surprise I found the original paint scheme under the white. It's obvious that it had been sanded on, but the lines and layout were still there enough to be able to perfectly duplicate it (or actually just paint over it!)
The trailer go a little more blue this weekend too!
May 9, 2010
Nice and warm here yesterday so I was able to get the patch piece glued down. Today I'll finish cleaning it up, prime it then roll her back over and start working on the top side again.
May 8, 2010
The weather has just sucked! I've been doing some prep in order to do some more gluing and I keep running into the less than 50 degree temperatures! Now if I had a nice warm shop, it wouldn't be an issue. OR, if Mary would let me keep her car outside, the garage would be available...not too likely!
During the past couple of weeks I've filled some of the holes with hysol and ground them smooth, then cut a patch piece to cover everything up. Today, i should be able to get it glued down. Oh yeah, during the past month I procured a vacuum pump and all the stuff I need to do vacuum bagging. I'm sure it'll come in handy in the gluing process.
I also stripped the trailer down to get it ready to touch up. Pics will be on tomorrows posting.
April 10, 2010
Hysol 9430 - $230.00 per gallon
You really don't want to mix any more than necessary at that price! So, with the help of some West System micro beads to thicken it up, Mary and I spread Hysol into the honeycomb edges and glued the patch piece in. As we got down near the end, I started "recovering" some of the spooge (aka squeeze out) and we barely had enough...but we did! Fortunately, the weather here yesterday was just perfect for applying hysol outside.
Today, Sunday, I'm going to remove the clamps and fill in the holes I had to make in order to hold everything in place. Next step will be to re cut the shaft hole and locate the strut. I want to install all of the inserts before I re-skin the bottom. I haven't yet counted all the holes I replaced, but it's a whole bunch! (see last photo)
April 4, 2010
THRIFTWAY, THRIFTWAY, THRIFTWAY...The last 2-3 weeks, I've been getting a few things taken care of on the big boat. We're testing on April 15th At Stan Sayres Pits on Lake Washington, so we needed to de-winterize exerything. Last weekend, we put the Allison in, pulled it outside and fired it up. During the winter Chief Payne and I consulted with Dixon Smith on an issue we had with the gearbox, and it turned out there was a mis-alignment on the bores of the output shaft. It caused the bearing to move around and generated some heat. We've been lucky that nothing serious has happened. During the trailer firing, we ran her for about 5 minutes and the gearbox was hardly warm. in the past it would have been bordering on hot, so it looks like we may have been successful in solving the problem.
SO...this weekend, I was able to spend some time on the yellow boat and finish up the roll over setup. On Saturday morning, I was able to roll the Streaker over (and over and over) so I can now take a good look at the bottom to see what will need to be done.
On Sunday, I decided to cut out the piece of replacement honeycomb and mark it on the bottom. Easter dinner cut the day short, so if the weather cooperates this week, I may break the saw out and cut away all that damage.
March 14, 2010
I spent another Saturday working on Miss Thriftway. We installed the prop shaft, and engine coupler and polished the bottom. We hadn't done that since we launched her, so it really needed it.
I pulled the crank out of the black engine. The 3/16" key is just not strong enough to stand up to the torque of a prop jumping in and out of the water, so I'm going to have the keyway modified to accomodate a 1/4" double key.
I also changed out the front angle piece on the hull so it would be able to support the roll over fixture. I also mounted the front fixture piece. Next week I'll do the back piece and try to roll her over.
March 6, 2010
ENGINE TIME -
I Picked up the heads from Dave at Engine Machine Specialties on Friday. He went through them and he set it up for the new cam I got from Delta Cams in Tacoma. He replaced the springs and checked the valve guide clearance to be sure the anticipated high RPM's won't cause me any grief. So Friday night I went and masked everything off because our weather here was suppose to be in the 60's on Saturday. Yea! - It was and I was able to paint them outside!
February 27, 2010
Guess what a steel tube filled with oily water, a plugged 1/4" hole and an air compressor can do? Take a look at some pictures Mary just HAD to take of me for the results.
I was working on the trailer, taking off some plywood down the center section when I pulled one of the screws out, water started spouting out. The realization hit me that, oh-oh, water inside tube - bad...Solution? of course, drill a hole near the bottom and let the water run out. So...that's what I did. Only thing was, water didn't come out, a thick oily ooze did. Ah ha! Fire up the air compressor and "help" it out! Oops, air is coming out the second screw hole, PLUG IT! Now, the oily ooze is is coming out faster...good! Damn, it stopped. Get the drill out and open the hole back up...I had no idea that I had a lot of pressure in the tube because when it let loose, IT LET LOOSE! I was standing just off center and wham, I got sprayed with some of the ugliest crap I've ever seen. Not only that, but it stained everything it touched. I guess - lesson learned!
I finished washing the center section and now am going to work on fitting the roll over fixtures.
I talked with Dave the machinist last week and the heads should be done this week. I'll get those and paint them up.
February 21, 2010
The last two Saturdays have been spent over on Vashon working on the "Big Boat". We're going to run Miss Thriftway on Lake Washington on April 15th in conjunction with the ULHRA when they hold their Spring Training, so we need to get her ready to go. Ryan is now back from going to school in Japan so he would like his ride. I made him go with me yesterday because we needed to polish the bottom and trailer. An extra set of hands is always good for that project.
Last Sunday was spent cleaning up the shop. I hadn't spent any time organizing anything since mid-November and it was getting hard to find stuff.
With spending yesterday over working on Thriftway, TODAY, I finally got back to working on Gold Streak stuff. In the last few weeks, I got the trailer back from Corky with the new hydraulic configuration and the folding support arms. I took the arms off and got them primed. While I had the paint out and the paint gun setup, I primed the roll over fixtures so they don't rust. Andrew did such a good job on the welding, I want to take care of them!
In addition, I got one of the junk yard motors back from Dave, the machinist, and painted it. It's not a junkyard motor anymore! I vividly remember that we used Ford DE1601 as the color for our engines so, thanks to Schucks (now O'Reilly's), I got a few cans of primer and Ford DE1601 Blue and went to work.
Ryan helped me by washing the left side of the hull while I was doing the painting. I put a set of sawhorses under the sponson and let the transom sit on the ground. This gives a pretty good flow so the water runs out pretty fast. Since I don't care about the bottom right now, it's no sweat to let it sit in the gravel. I'll clean the center section during the week.
Another "tool" I picked up in the past few weeks was a "blast cabinet". This makes it a whole lot easier to clean engine parts. Every good boat shop has one don't they?
February 7, 2010
Last weekend was taken up with the annual A.P.B.A meetings and social events. This yearís meeting was held here in Seattle, so with the anticipation of participating in more events in 2011, I figured I'd better go.
This weekend was spent doing things to allow me to move the boat around better. Saturday, I spent the day making a roll around dolly. This will allow me to put Gold Streak in the garage off the trailer. It also gives me the flexibility to work on the boat without some of the space restrictions usually found on a trailer. I found some 10" tube tire casters which makes moving the hull around on the gravel a whole lot easier.
Sunday, Andrew brought his welding equipment over so we could make the roll over fixtures. I want a method where I can roll her over with minimal effort, and be safe. I have 21' side to side in the carport area so with about a 15" extension on each end of the hull, I should be able to spin it like a roasted chicken on a rotisserie!
I still had about an hour before the SuperBowl, so I decided to start washing the compartments that have been hidden for 30 years under the deck. There was a lot of caked on dirt impregnated oil. Some of it is stuck on pretty good which means a slooooow process!
January 24, 2010
When Ron was here last week, he asked me if I was going to remove the battens. I told him I was trying to keep them so I didn't have to re-fair the deck. He advised me that in the long run of a restoration, I would most likely find that the amount of time saved by removing the battens versus having to work around them would prove to be more efficient if they were removed. So...off they came! Again, since I have never done a restoration, some of the obvious steps are foreign to me so I need HELP in figuring some of this stuff out...oh well.
So, with the battens now off, I needed to get the big plate that was installed after the log hit removed. LOTS of rivets, but it really didn't take all that long to get it off. Once off tho, WOW, it's a good thing it was there. The pictures say it all!
Dave came over for a few hours and helped by removing the steering box, foot peddle brackets and the old cable steering brackets that were attached to the air trap stringers. Next, I'm going to give her a good washing, then figure out how to roll her over and cut the bad part of the bottom off and start getting that repaired.
January 17, 2010
This weekend we put up the chain hoist on its roller, then figured out how to sling the hull to get it off the trailer. Once that was done, then we cleaned it up, and took it over to Corky Peterson's shop. Corky is going to make and install a removable hydraulic box so if I have the need to trailer launch, three bolts and two quick disconnects will allow the box to be removed so the hydraulics don't get wet. Another thing Corky is going to do is install a couple of folding arms for the supports. This way all we need to do is pull a couple of pins and the support arms will fold under the boat (similar to our Miss Thriftway trailer)
Steve West brought Ron Sr. over today and I had a chance to show him how well is work holds up after 30 years! We talked about some changes to consider making in order to make the Streak ride better. I won't go into detail, but some of them would be a significant change from the way she was back when. Ron was very kind with his "suggestions", and it's given me some things to think about.
Thanks to Steve for getting Ron over, he really seemed to ejoy the visit. Thanks to Madison and Alexander for keeping Kinno busy while we talked!
January 10, 2010
Spent a couple of hours Saturday just grinding off the thin veneer off the battens and around the engine compartment left from the router.
Sunday, I had Dixon Smith come over and, as he puts it, "kabitz" about what the next steps should be. We talked about how easy or hard it might be to remove the back extensions to the engine stringers so we could replace them. Then we talked about how to repair honeycomb. Again, for me this is a GIANT learning process because I've never done honeycomb but after going over it again, I know what I need to do and what equipment I'll need.
January 1, 2010
Ron was not able to come up this weekend, so I just continued to survey the transom area. The more I looked, the more I decided it needed to come off and be replaced. The original transom was 1/2" honeycomb. In talking with Dixon Smith, he told me that most of the current raceboats are just using a solid piece of aluminum for the transom. All it needed to do was keep the water out. The reinfocement structure for the rudder and strut are on the inside and are supplying the strength, so the transom doesn't need to be all that stout. So...off it comes!
Of course, NOW that we start taking it off, we discover the bottom is in real bad shape. While Dixon and I were talking about the transom, I was asking about how to repair honeycomb (remember, my specialty is WOOD!) He suggested I make a visit with him to the Budweiser shop and look over some hulls that are down there for repair now. I did so, and see that this may not be as complicated as I first thought. The biggest challenge I have is determining where the damage stops so I be sure to get it all fixed.
December 27, 2009
OK, so my ADD kicked in and I went to the transon and thought, "Hmmmm, I KNOW there was a piece of plywood added, so I wonder what is underneath it?" So two hours later, I found where the rudder was torn off confirming that the log hit indeed happen. There was a plywood patch where the rudder use to be when it was on the left side. Looks like I'm going to learn all about patching in honeycomb!
December 26, 2009
Dave and I removed the entire left side of the deck in 3 hours. Pretty exciting to have it mostly off now. With the exception of a few broken battens, everything looks in real good shape. No question that I have some work to do, but hey, IT'S 30 YEARS OLD! One thing you can say about a Jones hull, it's built to last!
Not really much more to report. Today (Sunday), I'll work on cleaning up some of the areas I couldn't get with the router with the grinder, remove any screws we missed and generally fuss around. Hoses will come off and so will the lifting arms in the back. I'm going to see if Ron will be available next weekend and maybe get him to come over and take a look.
December 19, 2009
More deck removal. Well, the technique is working better this week. I'm getting it figured out better AND I'm able to remove the screws I'm finding a lot faster too.
Dave and Andrew got back home with my new heads (craigslist - San Francisco). They are in great shape...certainly a lot better than the other ones. I still need to decide what to do with the junkyard ones. Maybe a rebuild myself for the experience.
December 12, 2009
More deck removal. During the week I read about a technique that just made this deck removal a whole lot easier. Locate the battens, take a long straight edge and mark them, take a router and set it to not quite the thickness of the plywood and remove all but a thin skin over the battens then pull off the deck piece in between. So simple yet if you haven't done it before, A MAJOR DISCOVERY! I guess this is the standard routine amongst the real boat builders, but this new discovery for me gets me one step closer to "gittin' 'er done". Today, I spent a lot of time removing the area around the sponson curve so I could preserve it for the re-deck.
During the week, I got one of the junkyard engines up to Dave, the machinist. After cleaning and inspecting, it turns out the block is good (needs to be bored to .040 over) but the heads, all 4 of them, are beyond repair. I found another pair of heads so that problem is solved.
December 6, 2009
Over the weekend, Dave and I worked on removing the hardware so we could remove the reinforced cockpit. Dan had an unused set of Jones cowlings that I bought from him so that is what I will use (vintage does not allow reinforced cockpits - it wasn't used originally) . Gordy plans on using this set as his plugs so he can make replacements for anyone who needs them. Anyway, Dave and I were successful in getting the cockpit removed in one piece. If anyone is interested, I have the APBA certificate that certifies it as usable in competition.
After the removal of the cockpit, we turned our attention to trying to figure out the best way to remove the deck without disturbing the battens. It will be a lot of work and maybe it would be better to just cut the battens out and replace them. I think I know where i might be able to get some wood for replacements...
I decided to have the 1964 engine block hot tanked and cleaned and checked. Since I already have one engine that is pretty much ready to go, and it has turned really cold outside, I'm going to see what I really have in the two engines I got from Ed Kelson. It's loaded in the back of my truck and will be dropped off tomorrow.
December 2, 2009
The day after Thanksgiving Gordy, me, brother Dave and nephew Andrew took off from Gordy's Tacoma home around 6:30am and at 5:35pm we pulled into the parking lot at the Super 8 Motel in Sacramento. We were greeted by the sight of a White hydroplane near the entrance. Dan and Lois had parked Floatin'-a-Loan right up front so we could see her. After spending some time oogling and ahhggling, and transfering the gear we all went to dinner then hit the pillows. The four of us decided it would be worth the effort to try to get out of town early, so we agreed that we would meet in the parking lot around 3:30am to leave. We pulled out at 3:40am and headed North.
The trip back was nice and easy but we bucked a headwind for the first two hours which drained the fuel economy. We stopped in Redding, CA. for fuel and breakfast, Albany, OR for fuel and lunch and made it back to Gordy's around 5:00pm. We then transferred all the gear over to Steve's truck, hooked up the boat and was eating dinner around 6:30pm with the Floatin'-a-Loan backed up under the shed where over the next year and a half, she'll be transformed back to the Gold Streak.
|


